Wednesday, November 30, 2011
Free Printable: Christmas Countdown
My son's first birthday is this weekend, and because of that I'm currently in full party-planning mode and not really thinking much about Christmas yet. That said, I decided to work on a little side project today that I thought I'd share with all of you!
Since this is the last day of November and the Christmas countdown has officially begun, I made a printable that can be framed for the whole family to see and change each day! These fit perfectly in a 5x7-inch frame, and you can choose from one of four colors (or all of them if you want to go crazy!): red, green, teal, and pink.
Click HERE to download the PDF file and print away!
I added some little hooks to a frame I had laying around, spray painted it grey, and then put one of the red countdowns in it. It's now hanging in our entry and I just love it!
I'll be swamped with preparations for a little munchkin party this week, but next week I'll have some great {inexpensive} party decorating ideas for you! I hope you're all enjoying the holidays!
Monday, November 28, 2011
Glow Stick Bath
Every few months we pull out a glow stick or two from the craft box, throw 'em in the tub, and take a spooky glowy bath. Tay loves it and says he's swimming in "swamp water." Fun little activity to shake up his bedtime routine!
Friday, November 25, 2011
Felt Marble Mazes
My four-year-old is obsessed with mazes right now. He calls them
"brainteasers" and is always wanting to get more activity books and iPad
apps that have mazes in them. I saw this idea a couple of weeks ago and
thought it'd be perfect for him.
All I did was sew two sheets of felt together, leaving a small opening for turning. I turned it right-side out, put a marble inside, and sewed all the way around the piece, staying as close to the edge as possible. I then planned the layout of the maze, marked the lines with pins, and sewed along each line, careful not to hit the marble. Lastly I took some small rectangles of felt and sewed one at the starting point and one at the end point.
Now he's got a maze to do again and again. Taylor absolutely loves it and I will definitely be making more of these for him for Christmas. Super cheap, super easy, and the kid loves 'em. What more could I ask for!
All I did was sew two sheets of felt together, leaving a small opening for turning. I turned it right-side out, put a marble inside, and sewed all the way around the piece, staying as close to the edge as possible. I then planned the layout of the maze, marked the lines with pins, and sewed along each line, careful not to hit the marble. Lastly I took some small rectangles of felt and sewed one at the starting point and one at the end point.
Now he's got a maze to do again and again. Taylor absolutely loves it and I will definitely be making more of these for him for Christmas. Super cheap, super easy, and the kid loves 'em. What more could I ask for!
Thursday, November 24, 2011
Wednesday, November 23, 2011
Tutorial: Ribbon Ball
My little Ollie will be one year old in less than two weeks, and I decided to make most of his gifts - partly to save money, and mostly because I can make him things he'll love just as much as store-bought toys.
This week's project: a soft, squishy ribbon ball. I've seen these in boutique stores selling for WAY too much money and decided I'd make him one myself. Here are the instructions in case you'd like to make one for a little munchkin in your life!
Materials Needed:
Ribbon Ball Pattern (you can download and print it HERE)
Felt (you can do one solid color or make it multicolored)
Grosgrain Ribbon
Sharp Fabric Scissors
Chalk
Instructions:
1. Cut out ribbon ball pattern shape and trace on felt six times.
2. Cut out all your felt shapes.
3. Cut out 18 pieces of grosgrain ribbon, approximately 4 inches long. Lay your pieces out the way you'd like them on the ball. Place three pieces of ribbon between each felt piece the way you'd like them arranged.
4. Place the first two pieces of felt on top of each other, right sides together. Take the first piece of ribbon, fold in half, and place between the two felt pieces with the cut edges sticking out about half an inch. Repeat for the other two pieces of ribbon.
5. Pin piece together and sew 1/4" from the edge.
6. Trim the raw ribbon edges down a bit and cut small snips up the edge you just sewed, being careful not to cut the seam. This will allow the fabric to form a nicer ball when you turn it right-side-out.
7. Repeat Steps 4-6 with third piece of felt. Now you've got something like this. Kinda looks like a funny hat, eh?
8. Now you'll need to repeat the steps 4-6 with remaining three pieces of felt, leaving a 3-4" gap open between two pieces for turning later.
9. Now you've got two halves of the ball. Place these two halves right sides together and pin all the way around, inserting your remaining ribbon pieces and pinning in place. Sew all the way around the ball. Make small snips up the edges you just sewed, being careful not to cut the seam.
10. Turn ball inside out and stuff with fiberfill. I didn't have enough so I ended up using some felt scraps and batting scraps as well. You can even use scrap fabric, old clothing, or even plastic bags if you want the ball to be crinkly.
11. Once fully stuffed, hand-stitch the opening shut.
DONE! I can't wait to give this to the wee one for his birthday. I may have to make a couple more in varying sizes for him to play with. If you make this, let me know how it turns out!
Tuesday, November 22, 2011
How To: Clean Brooms and Dustpans
I was sweeping my bathroom floor the other day and realized everything on the floor was sticking to the broom. When I reached down to clear the bristles off I noticed that they were VERY sticky, probably from sweeping the kitchen floor after the little one spilled his juice. My first thought was that we'd need a new hand broom, but then I thought about trying to clean it instead. I've never heard of anyone cleaning a broom, but surely it's possible, right?
Well I found that it definitely is possible, and it's really easy too! I'm thinking I'll make this part of my yearly fall and spring cleaning regimens. After all, who knows what kind of icky germy grossness is living in your brooms?
First I took the broom outside and beat the bristles against the sidewalk a few times, just to get as much dust out as I could before washing it.
I filled a large bowl with boiling water and set it in the kitchen sink, then added about a cup of bleach and set the broom in the water, making sure all the bristles were completely covered. While that was soaking I rinsed off the dustpan and filled the other side of the sink with boiling water and bleach, then let put the dustpan in it. I let both the broom and dustpan soak for about an hour, occasionally moving them around in the water to loosen anything that was stuck to them.
When the hour was up I ran both the broom and dustpan under hot water for several minutes, paying special attention to the bristles of the broom. Once thoroughly rinsed I set them on a hand towel to dry completely overnight.
My broom is now clean, sanitized, and not sticky! I'm going to try this method with my large broom as well. I feel much better sweeping my floor now that I know my broom isn't so gross.
Thursday, November 17, 2011
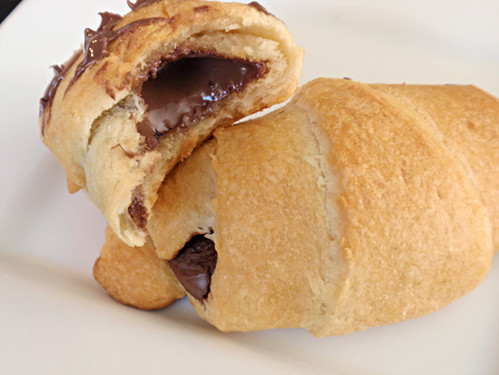
Nutella Croissants
(Re-posted from my personal blog entry, Sept. 2nd, 2011)
I really need to stop finding such amazing dessert recipes on Pinterest.
Seriously.
My mouth loves me; my waistline not so much.
That said, I HAD to share this recipe. It's simple, delicious, and you just can't go wrong with Nutella! I made a batch of these the other night and Sean and I may or may not have eaten them all in one sitting while watching Twister. True or possibly not true story. But most likely true.
So without further ado, the next dessert you should make for your family. Or maybe just yourself. Maybe make them and then hide in the bathroom and eat them so no one begs you for any. Can you tell I'm a mom?
Nutella Croissants (via Handle the Heat)
Place one tablespoon (more or less, depending on your preference) of Nutella onto the base of each triangle. Carefully roll the dough up to form a crescent shape.
Place rolls onto ungreased baking sheet and bake for 11-13 minutes or until golden brown.
*When I made these I also whipped up a little basic icing (powdered sugar, milk, softened butter, and vanilla) to spread on top. Perrrrrrrrrrfection.
I really need to stop finding such amazing dessert recipes on Pinterest.
Seriously.
My mouth loves me; my waistline not so much.
That said, I HAD to share this recipe. It's simple, delicious, and you just can't go wrong with Nutella! I made a batch of these the other night and Sean and I may or may not have eaten them all in one sitting while watching Twister. True or possibly not true story. But most likely true.
So without further ado, the next dessert you should make for your family. Or maybe just yourself. Maybe make them and then hide in the bathroom and eat them so no one begs you for any. Can you tell I'm a mom?
Nutella Croissants (via Handle the Heat)
- 8 tablespoons Nutella
- One package Pillsbury Butter Flake Crescent Rolls
Place one tablespoon (more or less, depending on your preference) of Nutella onto the base of each triangle. Carefully roll the dough up to form a crescent shape.
Place rolls onto ungreased baking sheet and bake for 11-13 minutes or until golden brown.
*When I made these I also whipped up a little basic icing (powdered sugar, milk, softened butter, and vanilla) to spread on top. Perrrrrrrrrrfection.
Subscribe to:
Posts (Atom)